CompositionalLayout으로 셀 중첩 대체하기
최근 셀 중첩 방식의 UI 구성이 데이터 전달 및 delegate 사용 측면에서 오버헤드라고 생각하여 CompositionalLayout으로 당근마켓 게시글 상세보기 뷰를 구현했습니다. 해당 뷰가 CompositionalLayout을 적용할 수 있는 양질의 예시는 아니지만, 연습의 의미에서 한 번 구현해 보았습니다.
완성된 뷰는 아래와 같습니다. 실제 당근마켓 앱과 다른 부분이 존재하니 유의해주세요!
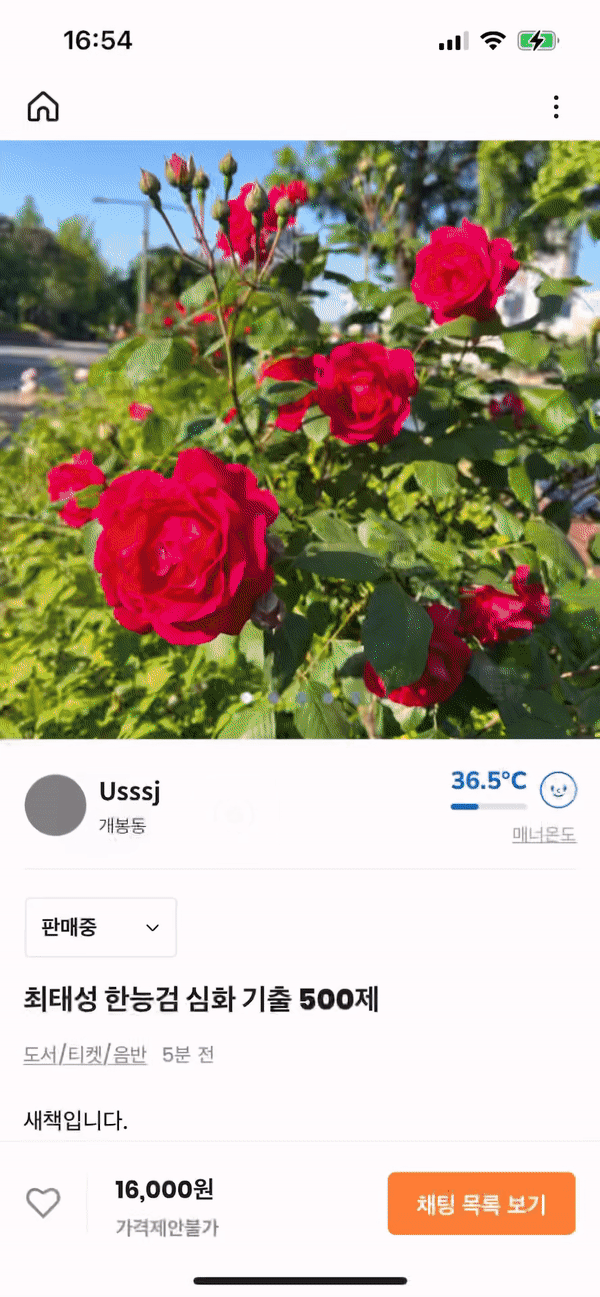
먼저 이 뷰에는, 스크롤이 되는 부분과 스크롤이 되지 않는 부분이 있습니다. 네비게이션바와 가장 아래쪽 뷰는 고정하고, 사이에 있는 영역을 스크롤 가능하게 만들어야 합니다.
그리고 그 안쪽에 페이지컨트롤과 함께 스와이프로 페이징을 할 수 있는 뷰가 존재합니다. 이 부분은 기존에는 컬렉션뷰 하나 중첩하여 구현했지만, compositionalLayout을 사용하면 하나의 컬렉션뷰로도 구현할 수 있습니다.
추가적으로 연습을 위해 판매자의 프로필 영역은 sectionHeader로 구성해 보았습니다. 결론적으로 위 뷰의 레이아웃으로 두 개의 섹션, 하나의 헤더, 두 개의 셀 타입이 사용되었습니다.
아래는 compositionalLayout을 이용한 collectionView의 작성 순서입니다.
1. compositionalLayout을 만드는 함수 작성하기.
아래를 보시면 compositionalLayout을 반환하는 메서드를 확인할 수 있습니다. UICollectionViewCompositionalLayout이라는 메서드의 클로저 파라미터를 이용하여 각각의 속성에 대해서 정의하는 모습을 볼 수 있습니다.
크게 보아 setionNumber가 0일 때와, 1일 때에 대하여 구분해서 설명하겠습니다.
extension PostDetailVC {
    internal func createLayout() -> UICollectionViewCompositionalLayout {
        return UICollectionViewCompositionalLayout { (sectionNumber, env) -> NSCollectionLayoutSection? in
            if sectionNumber == 0 {
                let itemSize = NSCollectionLayoutSize(widthDimension: .fractionalWidth(1), heightDimension: .fractionalHeight(1))
                let item = NSCollectionLayoutItem(layoutSize: itemSize)
                let groupSize = NSCollectionLayoutSize(widthDimension: .absolute(UIScreen.main.bounds.width), heightDimension: .absolute(UIScreen.main.bounds.width))
                let group = NSCollectionLayoutGroup.horizontal(layoutSize: groupSize, subitems: [item])
                let section = NSCollectionLayoutSection(group: group)
                section.orthogonalScrollingBehavior = .groupPagingCentered
                section.visibleItemsInvalidationHandler = { items, contentOffset, environment in
                    let currentPage = Int(max(0, round(contentOffset.x / environment.container.contentSize.width)))
                    self.pageControl.currentPage = currentPage
                }
                return section
            } else {
                let itemSize = NSCollectionLayoutSize(widthDimension: .fractionalWidth(1), heightDimension: .estimated(315))
                let item = NSCollectionLayoutItem(layoutSize: itemSize)
                let groupSize = NSCollectionLayoutSize(widthDimension: .fractionalWidth(1), heightDimension: .estimated(315))
                let group = NSCollectionLayoutGroup.horizontal(layoutSize: groupSize, subitem: item, count: 1)
                let section = NSCollectionLayoutSection(group: group)
                let headerSize = NSCollectionLayoutSize(widthDimension: .fractionalWidth(1), heightDimension: .estimated(85))
                let header =
                NSCollectionLayoutBoundarySupplementaryItem(layoutSize: headerSize, elementKind: PostDetailUserHeader.className, alignment: .topLeading)
                section.boundarySupplementaryItems = [header]
                section.orthogonalScrollingBehavior = .none
                return section
            }
        }
    }
}
- sectionNumber 0인 경우 : 스와이프하여 이미지를 전환하는 부분
itemSize : group에 비해 1의 배율을 가진다는 의미로 width, height를 잡아주었습니다.
groupSize : 이미지가 정방형으로 들어가야 하기 때문에, 화면의 width와 동일하게 잡아주었습니다.
section.orthogonalScrollingBehavior : section의 스크롤 스타일을 설정해 줬습니다.
section.visibleItemsInvalidationHandler : 이 메서드는 보이는 아이템의 속성을 컨트롤할 수 있는 메서드입니다. 아이템, 컨텐트오프셋, environment를 파라미터 인자로 가지고 있기 때문에 이를 이용해서 외부에 존재하는 pageControl의 cuurentPage를 바꿔줄 수 있습니다.
- sectionNumber 1인 경우 : 유저 프로필과 게시물 내용이 들어가 있는 부분
itemSize : estimated 속성을 이용하여 동적 셀을 구성했습니다.
groupSize : item과 group을 모두 estimated로 설정해야 동적 셀이 구성됩니다!
NSCollectionLayoutBoundarySupplementaryItem : header 또는 badge와 같은 SupplementaryItem을 만들 수 있습니다.
section.boundarySupplementaryItems : 섹션에 위에서 만든 헤더아이템을 넣습니다.
위와 같이 createLayout이라는 메서드로 CompositionalLayout을 만들 수 있게 되었습니다. 이제는 이 레이아웃을 컬렉션뷰를 생성할 때 사용합니다. 아래와 같이 컬렉션뷰를 생성할 때 createLayout() 메서드를 사용할 수 있습니다.
private lazy var detailCV: UICollectionView = {
    let layout = createLayout()
    layout.configuration.interSectionSpacing = 0
    let cv = UICollectionView(frame: .zero, collectionViewLayout: layout)
    cv.showsHorizontalScrollIndicator = false
    cv.backgroundColor = .carrotWhite
    return cv
}()
2. 다음으로 사용해줄 셀을 등록하고, 딜리게이트를 채택해 줍니다.
private func setDelegate() {
    detailCV.delegate = self
    detailCV.dataSource = self
}

private func setCollectionView() {
    detailCV.register(PostDetailUserHeader.self, forSupplementaryViewOfKind: PostDetailUserHeader.className, withReuseIdentifier: PostDetailUserHeader.className)

    PostImageCVC.register(target: detailCV)
    PostContentCVC.register(target: detailCV)
}
3. 다음으로는 CollectionViewDataSource를 지정해 줍니다. 또한 sectionType 별로 cell을 지정해 할당합니다.
extension PostDetailVC: UICollectionViewDataSource{

    func collectionView(_ collectionView: UICollectionView, numberOfItemsInSection section: Int) -> Int {
        guard let sectionType = SectionType(rawValue: section) else { return 1 }

        switch sectionType {
        case .imageSection: return 5
        case .postSection: return 1
        }
    }

    func numberOfSections(in collectionView: UICollectionView) -> Int {
        return 2
    }

    func collectionView(_ collectionView: UICollectionView, viewForSupplementaryElementOfKind kind: String, at indexPath: IndexPath) -> UICollectionReusableView {
        if kind == PostDetailUserHeader.className {
            let view = collectionView.dequeueReusableSupplementaryView(ofKind: kind, withReuseIdentifier: PostDetailUserHeader.className, for: indexPath)
            return view
        }
        else { return UICollectionReusableView() }
    }

    func collectionView(_ collectionView: UICollectionView, cellForItemAt indexPath: IndexPath) -> UICollectionViewCell {

        guard let sectionType = SectionType(rawValue: indexPath.section) else { return UICollectionViewCell() }

        switch sectionType {
        case .imageSection:
            guard let postImageCell = collectionView.dequeueReusableCell(withReuseIdentifier: PostImageCVC.className, for: indexPath) as? PostImageCVC else { return UICollectionViewCell() }
            postImageCell.setData(postImage: ImageLiterals.PostDetail.sample[indexPath.row])

            return postImageCell
        case .postSection:
            guard let postContentCell = collectionView.dequeueReusableCell(withReuseIdentifier: PostContentCVC.className, for: indexPath) as? PostContentCVC else { return UICollectionViewCell() }
            postContentCell.delegate = self
            self.postContentCell = postContentCell

            return postContentCell
        }
    }
}
4. pageControl이 함께 스크롤되는 느낌을 주기 위해서 snpakit의 remakeConstraints를 적용해 줍니다.
extension PostDetailVC: UICollectionViewDelegate {
    func scrollViewDidScroll(_ scrollView: UIScrollView) {
        self.pageControl.snp.remakeConstraints { make in
            make.centerX.equalToSuperview()
            make.top.equalToSuperview().inset(-scrollView.contentOffset.y+UIScreen.main.bounds.width-40)
        }
    }
}
완성! 느낀점.
UICollectionViewCompositionalLayout에서 유용한 기능들이 많이 존재하는 것 같아. 예를 들어 supplementary로 badge를 넣을 수 있는데, 이 badge를 X 버튼이나 check 버튼으로 사용할 수 있을 것 같다. 이번에 만들어 본 당근마켓의 뷰는 compositionalLayout을 적용하기에 최적의 예시는 아니었지만, 다른 뷰를 작성할 때 유용하게 사용할 부분이 있을 것으로 보인다.
'iOS > Swift - UIKit' 카테고리의 다른 글
| [Swift] Modern Concurrency Swift ( 1편 - Thread Class로 Thread 문제 파헤치기 ) (0) | 2023.02.22 |
|---|---|
| [Swift] Notification Center 개념 (0) | 2022.05.21 |
| [Swift] URLSession(1) - 개념 모아보기(URLSession, URLSessionConfiguration, URLSessionTask) (0) | 2022.03.29 |
| [Swift 문법] Error Handing(오류처리), try-throw와 do-catch, rethrow, defer (2) | 2022.03.27 |
| [Swift 객체지향] 2 - 구조체와 클래스의 차이점 (0) | 2022.02.10 |

